

I am always looking for fun crafts that my daughter might enjoy. And this year I thought we should do salt dough ornaments. Can you believe that I have never done these before? Well I think this is going to be a new family tradition and we will be doing this every year from now on.
Last weekend my daughter and I made the salt dough ornament recipe and cut out all the shapes. We had a pretty busy week so we did not get a chance to paint them till yesterday, but that is okay once baked these ornaments can sit around till you have time to be creative.
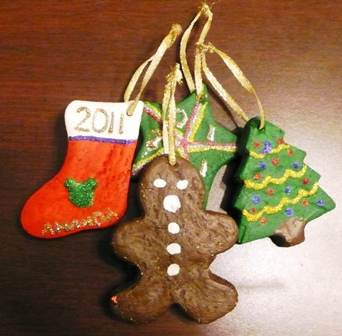
So yesterday some friends called and said they were coming over with there kids and I thought lets paint these suckers. So I set everything up and when the kids got here they got to work decorating the salt dough ornaments. I have to say that after a while they got board and went to go play but would come back from time to time to decorate more. Us parents on the other hand could not resist the urge to decorate ourselves and ended up paining quite a few, it was quite fun!
I really think this would be a great craft for a party, you could bake all the ornaments then set everything up for decorating and let the kids at it. For a birthday just cut shapes out for your theme. The kids will have a blast making there own take home gift!
PRINT RECIPE
Ingredients
4 Cups All-Purpose Flour
1 Cup Salt
1 ½ Cups warm water
Directions
Preheat oven to 300 degrees F
 |
Mix flour and salt well. Gradually add water, stirring with a large spoon.
Finish mixing with hands. Knead until soft and pliable.


Roll out dough on a floured surface. Cut shapes out with cookie cutters.
Place on lightly greased cookie sheet.

Use a toothpick to make hole for string. (Note: insert toothpick then twist it around to make hole bigger)
Bake at 300 for about 1 hour or until dough is hard.
Once cool paint and decorate. Then spray with clear finish to preserve.
Decorating
Supplies
Paint
Glitter Glue
Clear Finisher
Ribbon
Paint the Salt Dough Ornaments first then once dry you can decorate with Glitter Glue
 Af
Af

After all the paint and glitter glue are dried spray with a clear finisher spray then tie your ribbon on to hang from the tree.

Now you will have a bunch of new home made Christmas ornaments you can keep or give to family and friends.

One of these days I'm going to make these with the kids! Would love if you linked this to my Kids Can Craft party so others are inspired. It's always open - there's a tab at the top of my blog to find it:)
ReplyDeleteCheryl, they are pretty easy to make I am sure your kids will have fun making and decorating them.
ReplyDeleteAnd thanks for the info on the craft party. I will go check it out.
Hi! I'm a new follower from the Mingle With Us blog hop! Thanks for this idea - I used to make these as a kid but couldn't remember how it was done!
ReplyDeleteDianna
craft-a-spell.blogspot.com