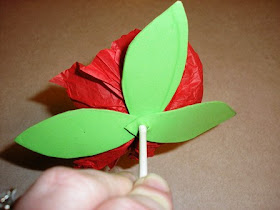
With Valentines Day fast approaching, I decided yesterday that we needed to get started on the 20+ valentines for my daughter to pass out to her friends at school. So yesterday I got all the stuff together and we started making some Lollipop Valentines. We only made a few yesterday but that is okay we can do a couple every day and then be done in plenty of time.
The last couple of years we decided it was more fun to make a special treat (last year we made Butterfly Lollipops) than to just buy them at the store. Not to mention it is usually cheaper. For this project you can get everything you need at the dollar store, which makes this a pretty cheap valentine for your kids.
And since my daughter is in Kindergarten this helps her with her writing since I will have her write a small note on each leaf (I did the first one in the picture to show her what to do). I know when my daughter makes things to pass out she feels so proud and just enjoys the whole giving experience more.
you will need to help your younger kids a bit with this project since there is some cutting to do but they can do quite a bit of it them selves.
Do you prefer to receive homemade Valentines or do you prefer the store bought?
Supplies
Blow pops (or any lollipop you like)
Tissue Paper (we used red but you could also use pink)
Green Foam Paper
Directions
Each sheet of Tissue Paper will make 4 flowers. So you will need to cut your sheet in to 4.
Start by folding your paper in half one way then fold it in half again the other way. This should give you a square piece of tissue paper.
Cut your paper on the creases to get your 4 sheets.
Place your lollipop in the center of one square and fold the paper around the lollipop and then twist the paper around. You can choose to cut off any extra paper if you want but you don't have too.
Next draw out a leaf shape on your foam paper. Then you can have the kids trace the leaf to make more.
Cut your leafs out and have your children write a message on the leafs. Each flower will get three leafs so they can write three messages if you want.
Stick your your lollipop through one end of the leaf and push them up. This will help to hold the paper in place.
Just do this how ever many times needed to get enough for the class.


Tracey,
ReplyDeleteThese are great! I've been trying to decide what to have the kids do for school Valentines and I think this may be it! Thanks for sharing at A Humble Creation. Oh, and definitely prefer handmade any day!
So glad you like them! And thanks for hosing a great party!
DeleteThese are so cute! Thanks for sharing them with us on the Creative Corner Hop.
ReplyDeleteSandy
Cherished Handmade Treasures
You have a wonderful blog!! I'm your newest follower from the “Adorned From Above” blog hop - this is my blog if you wanted to follow back: godsgrowinggarden.com
ReplyDeleteThanks
Angie
These are so cute. Thanks so much for sharing at Wednesday's Adorned From Above Blog Hop 36.
ReplyDeleteDebi and Charly @ Adorned From Above
Marci @ Stone Cottage Adventures
Nichi @ The Mandatory Mooch
Following from Thursday's Favorite Things blog hop. Such a sweet craft idea and I love your little one can actually help with her Valentines. cheermamadrama.blogspot.com
ReplyDeleteSo cute and such a great idea. I must say Valentines day school parties are much more interesting since I was young! Just cruising Katherine's blog hop and thought I would say hi!
ReplyDeleteGreat idea, and I love that the kids can be totally involved from start to finish! Just posted on Craft Gossip!
ReplyDeletehttp://lessonplans.craftgossip.com/?p=7534
Very cute idea! I like that it is easy enough for the kids to help! I just started a new link party and would love for you to come over and share your post or any social media sites. Talkin’ About Thursday - http://designeddecor.com/talkin-about-thursday-link-party4/
ReplyDeleteDeDe@DesignedDecor
Very cute and I bet her friends at school will love them!
ReplyDeleteThanks for sharing at Sharing Saturday.
Such pretty flowers!!
ReplyDelete